POSTED ON 24 MAY 2021
READING TIME: 13 MINUTES
Introduction to Progressive Web Applications - part 2

In the first part of the series, we covered the main techniques that allow us to create a basic Progressive Web Application. In this part we will introduce the Service Worker API to allow our web application to work offline.
Service Workers
To achieve our goal we need to learn a little more about Service Workers. In the first part, we created Service Worker Javascript File (sw.js) which was imported in index.html. To make our application installable, we added a single event listener.
self.addEventListener('fetch', (event) => {
  console.log('fetch');
});
The ‘fetch’ event is one of the key events that allow us to make our application work offline. In this post we will use this event to handle requests and responses in combination with the Cache API. Before we do that, we’ll look at some lifecycle events to get a fuller picture of Service Workers.
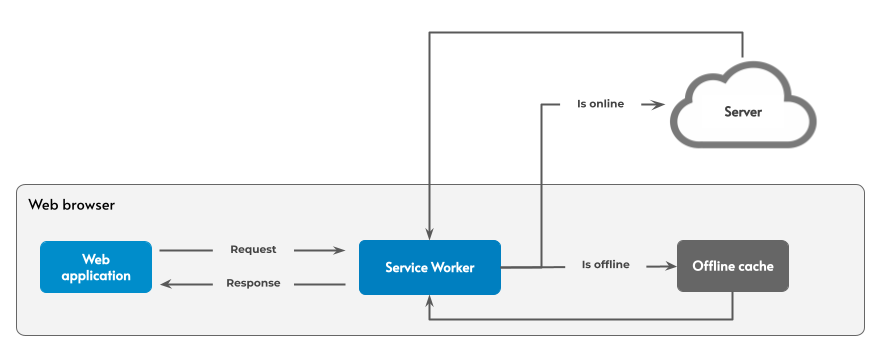
“Service workers essentially act as proxy servers that sit between web applications, the browser, and the network (when available).”
Service Workers are a type of web worker - they execute in a separate thread from the main browser thread. They:
- Are Promise based
- Are only available on secure origins served through TLS, using the HTTPS protocol (working locally from localhost origin is not subject to this requirement)
- Depend on the Fetch and Cache APIs
- Have access to the IndexedDB API
Service Workers sit inside the web browser and are set up to handle browser requests and server responses from the Internet when we are online, or from the cache when offline.

Service Workers are designed to:
- Handle network requests and store content for offline use)
- Handle push events
Life Cycle
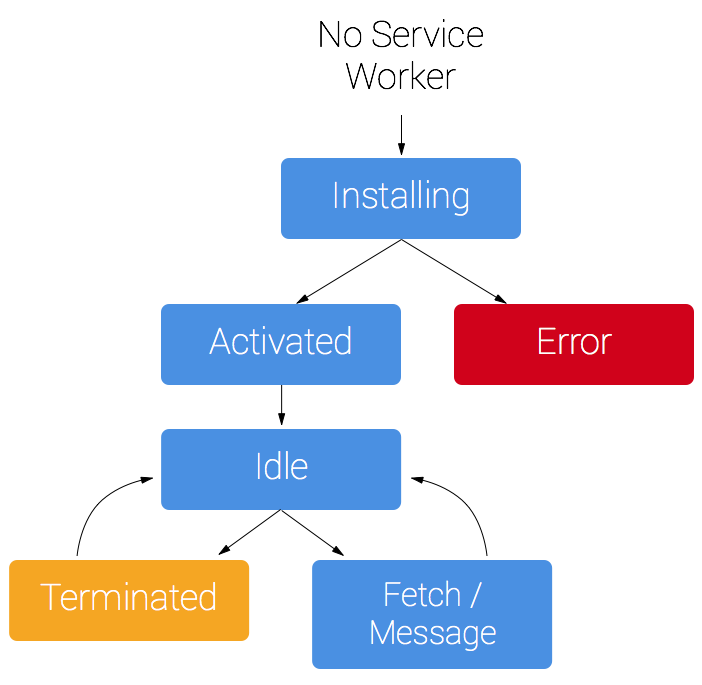
At first glance, the Service Worker lifecycle appears quite complicated, but once you know how it works you can make use of it to its full potential.

source: Introduction to Service Worker
We can see the installation and activation phase but before that you need to register as a Service Worker. Note that only one version of your service worker is running at a time on registered scope.
<!DOCTYPE html>
<script>
  navigator.serviceWorker.register('/sw.js')
    .then(reg => console.log('SW registered!', reg))
    .catch(err => console.log('Registration failed', err));
</script>
The diagram above shows the life cycle for newly registered Service Worker. There are some differences when updating a previously registered worker to a newer version.
Events
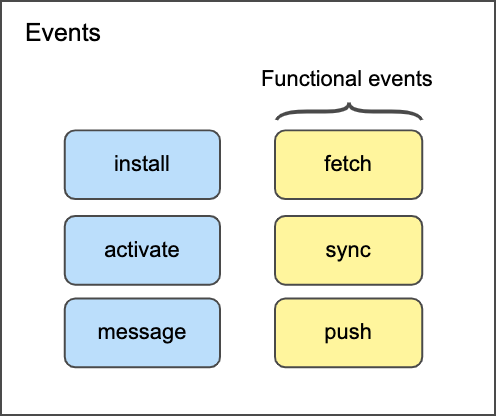
Service Workers have six basic events.

Install Event
After the Service Worker is registered (i.e. downloaded to the client), the “install” event is the first one that the Service Worker receives. This event is fired once per Service Worker upon registration.
In the install event listener usually you can cache your static assets on the client web browser to make your web application working offline. All the JavaScript, CSS, images and other assets can be stored by the browser for use when offline.
To register an “install” event listener:
self.addEventListener('install', (event) => {
  console.log('install');

  // forces the waiting service worker to become the active service worker.
  self.skipWaiting();

  // delay install by caching assets and open database
  event.waitUntil(cacheStaticAssets());
});
You can also see that the install event offers the waitUntil method. This method accepts a Promise and the Promise resolution (success or failure) will tell the Service Worker if the installation process is completed as expected. cacheStaticAssets is a function which returns a Promise. We will cover the body of this function in the Cache API section in this post.
Once successfully installed, the updated worker will wait until any existing worker is service no clients. skipWaiting functionality prevents the waiting, meaning the service worker activates as soon as it's finished installing.
Activate Event
If there are no clients controlled by another Service Worker and if a current Service Worker is installed then the “activate” event triggers. Here you can do additional setup such as cleaning up old cache data.
"Activate" also exposes two additional functions:
event.waitUntil()- you can pass a Promise that will delay activation. Usually, when new cache policy was implemented then in this event you can do cleanup and remove the old cacheself.clients.claim()- allows an active service worker to set itself as the controller for all clients within its scope (without reloading).
self.addEventListener('activate', (event) => {
  self.clients.claim();
  event.waitUntil(caches.delete(CACHE\_NAME).then(cacheStaticAssets));
});
Message Event
This event allows us to react to communication between our web application and Service Worker.
There are few ways of communication between application and the Service Worker:
In the post, we’re going to focus on the Clients API.
Application.js
// Listen to the response
navigator.serviceWorker.onmessage = (event) => {
  // event.data - contains data received from Service Worker
};

// Send message
navigator.serviceWorker.controller.postMessage({
  type: 'MY\_EVENT',
  data: 'some-data'
});
ServiceWorker.js
// Listen for messages
self.addEventListener('message', (event) => {
  if (event.data && event.data.type === 'MY\_EVENT') {
    // Select the clients we want to respond to
    self.clients.matchAll({
      includeUncontrolled: true
    }).then((clients) => {
      if (clients && clients.length) {
        // Send a message
        clients.forEach(client => client.postMessage({
          type: 'MY\_EVENT',
          data: 'some-data'
        }))
      }
    });
  }
});
As you can see we have two-way communication here. We can use the postMessage function to pass an object with a `type` property which can be a message type identifier.
Working Offline
Now that we know how to register Service Workers, what their life cycle and events look like, let's see how we can tie it all together to make our application work offline.
First, we need to learn more about the Cache API and the Service Worker fetch event.
Cache API
“The Cache interface provides a persistent storage mechanism for Request / Response object pairs that are cached in long lived memory.”
The Cache API is exposed to window scope and workers. As it’s quite a simple API, you need to take care of housekeeping activities such as purging stale cache data. Let’s look look at an example:
ServiceWorker.js
const CACHE\_NAME = 'cache-and-update';
const STATIC\_ASSETS = \[
  './',
  './index.html',
  './index.bundle.js',
  './assets/',
  './assets/my-logo-128.png',
  './manifest.json'
\];

self.addEventListener('install', (event) => {
  // forces the waiting service worker to become the active service worker.
  self.skipWaiting();

  // delay install by caching assets and open database
  event.waitUntil(cacheStaticAssets());
});

self.addEventListener('activate', (event) => {
  // allows an active service worker to set itself as the controller for all clients within its scope.
  self.clients.claim();

  // remove old cache and then cache new static assets
  event.waitUntil(caches.delete(CACHE\_NAME).then(cacheStaticAssets));
});

function cacheStaticAssets() {
  return caches.open(CACHE\_NAME).then((cache) => cache.addAll(STATIC\_ASSETS))
}
Fetch Event
Fetch event contains information about the fetch, including the request and how the receiver will treat the response. Let’s update our code and connect the Cache API with the Service Worker fetch event.
ServiceWorker.jsconst CACHE\_NAME = 'cache-and-update';
self.addEventListener('fetch', (event) => {
// respond from cache first
event.respondWith((async function() {
// fallback for navigate requests
if (event.request.mode === 'navigate') {
return getCachedIndex();
}
const response = await fetchFromNetworkFirst(event.request);
return response;
})());
});
async function fetchFromNetworkFirst(request) {
try {
const response = await fromNetwork(request);
await updateCache(request, response.clone());
return response;
} catch(e) {
const responseFromCache = await fromCache(request);
if (responseFromCache) {
return responseFromCache;
} else {
throw e;
}
}
}
function getCachedIndex() {
return caches.open(CACHE\_NAME).then((cache) => cache.match('index.html'));
}
function fromCache(request) {
return caches.open(CACHE\_NAME).then((cache) => cache.match(request));
}
function fromNetwork(request) {
return fetch(request);
}
function updateCache(request, response) {
return caches.open(CACHE\_NAME).then((cache) => cache.put(request, response));
}As you can see we are using the event.respondWith method that prevents the browser's default fetch handling, and allows you to provide a Promise for a Response yourself. In our implementation we are trying to fetch data from the network first and when the network is not available then trying to get the response from cache. Notice that when the fetch request is successful, we update our cache with the data from the response.
This implementation is one of the approaches to make the application work even if the user doesn't have an Internet connection. But of course, this is not the perfect solution. In the case where a user needs data that’s not in cache they will not see on a screen what they need on screen. Fortunately, Service workers offer the Web Background Synchronization and Web Periodic Background Synchronization APIs that can help us solve this problem. Note that these APIs are still in draft and may not work in all browsers and devices.
Web Background Synchronization
As the name says, this API enables web applications to synchronize data in the background.
Key facts:
- Enables client and server data synchronisation of, for example, photo uploads, document changes, or draft emails
- Allows the service worker to defer work until the user has connectivity
- Requires the service worker to be alive for the duration of the fetch
- Suited to short tasks like sending a message
On the web application side, first we need to wait for the Service Worker registration and then we can use sync.register function in the following way.
Application.js
const registration = await navigator.serviceWorker.ready;

registration.sync.register('my-tag');
On a Service Worker side we react to a sync event as follows:
ServiceWorker.js
self.addEventListener('sync', event => {
  if (event.tag == 'my-tag') {
    event.waitUntil(doSomeWork())
  }
})
As you can see we are only allowed to pass a string parameter which is called “tag” and is a kind of identifier of the sync registration.
Unlike the fetch event, here on the Service Worker side, we don’t have access to the request, so we cannot use event.request and use it to handle background synchronisation as we did with the Cache API.
We can experiment a little with this API and try to use “tag” to pass information about the request that we want to send. Because we can pass only a “tag” which is a string, let's stringify the configuration object and pass it as a tag.
First on the web application, we will handle cases when users don’t have access to the Internet. Let’s create two files in our web application side called Application.js and requestWithBackgroundSync.js.
Application.js
import requestWithBackgroundSync from "utils/requestWithBackgroundSync";

const someApi = {
    getItems: () => requestWithBackgroundSync("https://domain.name/api")
        .then(response => response.json())
};

// make request
someApi.getItems();
Here we are just calling the server using requestWithBackgroundSync function. This function returns a Promise, and then we can parse the response (similar as when using fetch API). Let's implement the requestWithBackgroundSync function.
requestWithBackgroundSync.js
function requestWithBackgroundSync(url, config) {
  return fetch(url, config)
    .catch(() => backgroundSyncRequest(url, config));
}

export default requestWithBackgroundSync;
We attempt to get data using the fetch function and if the fetch fails (for example because of the network connection issues) then we will catch it and return a Promise implemented inside the backgroundSyncRequest function. Now we will implement this function using sync functionality if the Service Worker registration.
requestWithBackgroundSync.js
import uuidv4 from "uuid/v4";

async function backgroundSyncRequest(url, config) {
  // data that are passed to sync event
  const jsonTag = createFetchSyncDataObj(url, config);

  await registerBackgroundSync(JSON.stringify(jsonTag));

  // background sync data receive experiment
  const { data, headers } = await getDataFromBackgroundSyncByJsonTag(jsonTag);

  return prepareResponse(data, headers);
}

function createFetchSyncDataObj(url, config) {
  // method name used to extract data from body by service worker
  // TODO: detect method name by "Content-Type" header
  const bodyExtractMethodName = 'json';

  return {
    type: 'fetch-sync',
    requestId: uuidv4(),
    url,
    config,
    bodyExtractMethodName,
    link: document.location.href
  };
}

async function registerBackgroundSync(tag) {
  const registration = await navigator.serviceWorker.ready;

  registration.sync.register(tag);
}

function getDataFromBackgroundSyncByJsonTag(jsonTag) {
  // TODO: add timeout and remove event listener after timeout
  return new Promise(resolve => {
    const handler = createFetchSyncMessageListener(jsonTag, onDone);

    function onDone(data) {
      navigator.serviceWorker.removeEventListener('message', handler);
      resolve(data);
    }

    navigator.serviceWorker.addEventListener('message', handler);
  });
}

function createFetchSyncMessageListener(jsonTag, done) {
  function handler(event) {
    const receivedJsonTag = parseJson(event.data.jsonTag);

    if (receivedJsonTag) {
      const isFetchSyncMessage = receivedJsonTag.type === 'fetch-sync';
      const isTheSameRequestId = jsonTag.requestId = receivedJsonTag.requestId;

      if (isFetchSyncMessage && isTheSameRequestId) {
        done(event.data);
      }
    }
  }

  return handler;
}

function prepareResponse(data, headers) {
  // TODO: build blob based on "Content-Type" header (for now JSON is created)
  const blob = new Blob(\[JSON.stringify(data)\]);
  const response = new Response(blob, { headers });

  return response;
}

function parseJson(str) {
  try {
    return JSON.parse(str);
  } catch(e) {
    return undefined;
  }
}
We are using “tag” (which is a string) to pass to Service Worker information about the request that we want to make.
Note that the object that we want to send to the Service Worker contains among others a requestId which will serve us for identifying if the response that we will get from the Service Worker will match the request that we want to make. We do this because we cannot use event.respondWith function and return a response. Of course, this approach has some limitations. We are losing all other information that the Request object has out of the box like for example the credentials, cache, mode or the methods implemented inside the Request object.
To get the data back from the Service Worker we are using a message event. As you probably noticed, we are always expecting to have a JSON response so that, after getting the data back, we are also preparing a JSON response. In the future, if this experiment goes well, we could extend this solution to support more response formats.
Let's check now the code inside Service Worker.
ServiceWorker.js
self.addEventListener('sync', (event) => {
  const receivedJsonTag = parseJson(event.tag);

  if (receivedJsonTag && receivedJsonTag.type === 'fetch-sync') {
    const { url, bodyExtractMethodName, config } = receivedJsonTag;

    event.waitUntil(
      (async function () {
        try {
          const response = await fetch(url, config);

          const headers = {};
          response.headers.forEach((val, key) => {
            headers\[key\] = val;
          })

          await updateCache(url, response.clone());

          // extract data from body by received method name
          const data = await extractDataFromResponse(response, bodyExtractMethodName);

          self.registration.showNotification(\`Background sync finished with success\`, { data: { link: receivedJsonTag.link } });

          return sendMessageToAllClients({ jsonTag: event.tag, data, headers });
        } catch(e) {
          if (event.lastChance) {
            self.registration.showNotification(\`Can't get ${url}\`);
          }
          throw e;
        }
      })()
    );
  }
});

function parseJson(str) {
  try {
    return JSON.parse(str);
  } catch(e) {
    return undefined;
  }
}

function updateCache(request, response) {
  return caches.open(CACHE\_NAME).then((cache) => cache.put(request, response));
}

async function extractDataFromResponse(response, methodName) {
  if (BODY\_EXTRACT\_METHOD\_NAMES.includes(methodName)) {
    return response\[methodName\]();
  }

  throw new Error(\`Can't extract data from response body by method ${methodName}\`);
}

function sendMessageToAllClients(msg) {
  return clients.matchAll()
    .then(clients => {
      clients.forEach(client => client.postMessage(msg))
    });
}
We registered a sync event handler, parsed stringified JSON and then used event.waitUntil function. This function accepts a Promise and will try to execute this Promise until it is resolved with success or reached the limit. In this Promise we are making the request and if it is made successfully then we are putting the response to cache and then sending response to clients by posting a message.
Take a note that sync event has the lastChance property. This property tells us if this was the last attempt of making our request. After that sync event will fail.
Summary
This is the end of our journey with Service Workers and related APIs. We learned how to make our application offline using them but you need to know that this is not the only way to do it. Everything depends on your needs and requirements. The Service Worker API is quite new and some of its features are still in draft, so can behave differently on different platforms.
At the end I will leave you some links that can be helpful in further exploring progressive web apps: