POSTED ON 17 SEP 2021
READING TIME: 6 MINUTES
API test automation with FreeMarker and Cucumber
A challenge often encountered when automating server API testing is managing the volume of different request bodies required to provide good coverage. Sure, when there are only a few requests to send and test, bodies can be hardcoded JSON or XML files, but things quickly get messy when dealing with more complex scenarios - multiple endpoints, each with multiple request flavours. Hardcoding each request across perhaps hundreds of files is not practical in these cases.
Requests templates to the rescue! In this post, I’m going to share how we use a template engine along with Cucumber to simplify API test automation.
Apache FreeMarker is an open source template engine written in Java. Thanks to FreeMarker we can combine templates with data (name-value pairs) and produce text output that can be used by our code (e.g. automated tests script).
FreeMarker Template Language (FTL) allows us to define parameters, set default values, use conditional blocks, iterations, assignments, and lots more. In this post, I’m going to show how you can use FreeMarket to generate REST request bodies as part of a test automation suite.
API testing
Obviously, to test APIs we need to send requests to a server and verify the response. FreeMarker is a tool that can help us create a request body in a very flexible way. We can use it to prepare any type of request, which means there is no difference if we are going to test Soap, REST or GraphQL requests.
Let’s imagine we need to post a REST request with the following JSON body:
{
     "key": "keyValue",
     "matcher": "matcherValue",
     "value": "aaa"
}
We could, of course, hardcode this JSON in test code, but what if we need to perform multiple tests of the same request with different values? FreeMarker can help us achieve this without having to hardcode each request.
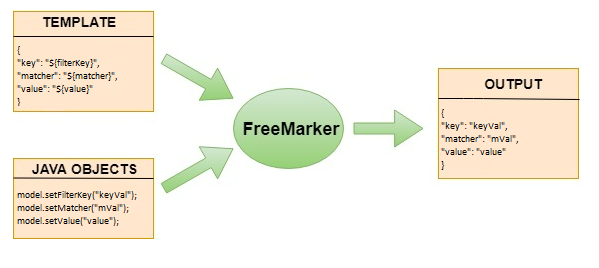
First, let’s create a FreeMarker template containing the JSON body we require.
{
     "key": "${filterKey}",
     "matcher": "${matcher}",
     "value": "${value}"
}
As you can see, we’ve replaced hard coded values with FreeMarker interpolations (${...}).
We can use this template each time we need to send a request with that JSON body. All we have to do is to pass a Map of key value pairs to the template engine to get the desired output. This approach gives us great flexibility and requires less (duplicate) code.
OK, time for some code.
Add FreeMarker dependency
First we need to add the FreeMarker dependency (library) to our project. If we use Maven or Gradle we just need to add dependency to pom.xml or build.gradle file.
If you’re using Maven, add the following to your pom.xml:
<dependency>
    <groupId>org.freemarker</groupId>
    <artifactId>freemarker</artifactId>
    <version>2.3.31</version>
</dependency>
If you’re using Gradle, add the following to your build.gradle:
implementation group: 'org.freemarker', name: 'freemarker', version: '2.3.31'Configure template engine
When it is done and we can see the FreeMarker library in External Libraries, we have to create a configuration method for our template engine.
private static Configuration setupFreeMarker(String templatesLocation) throws IOException {
    Configuration cfg = new Configuration(Configuration.DEFAULT\_INCOMPATIBLE\_IMPROVEMENTS);
    cfg.setClassForTemplateLoading(RequestsTemplateProcessor.class, templatesLocation);
    return cfg;
}
This method must be invoked before the first request is sent. Each request needs a cfg object to be sent successfully. The best option is to invoke this method once in the static block or in @Before hook, if we use JUnit, TestNG or Cucumber.
Create templates
Create a requests subdirectory under src/resources - this is where we’ll store our FreeMarker templates (.ftl files). We’ll pass this directory name when initializing FreeMarker.
Note that the path is relative
setupFreeMarker(“/requests”);Process templates
Once you’ve initialized FreeMarker, you can then use it to process templates. The convenience method below shows how to do this.
/\*\*
     \* This method combines FreeMarker template, given params and returns output string with all parameters replaced by values taken from params Map.
     \*
     \* @param templateName templates name
     \* @param params templates params
     \* @param config FreeMarker configuration
     \* @return parameterized string
     \*/
    public static String process(String templateName, Map params, Configuration config) {
        try {
            Template template = config.getTemplate(templateName);
            Writer out = new StringWriter();
            template.process(params, out);
            return out.toString();
        } catch (TemplateException | IOException e) {
            throw new RuntimeException(e);
        }
    }
The following shows how to use the engine directly from Java.
Configuration config = setupFreeMarker(“/requests”);
    Map params = new HashMap<String, String>();
    params.put(“filterKey”, “keyValue”);
    params.put(“matcher”, “matcherValue”);
    params.put(“value”, “aaa”);
    String outputString = process(“request1.ftl”, params, config);
{
"key": "${filterKey}",
"matcher": "${matcher}",
"value": "${value}"
}
| FreeMarker | {
"key": "keyValue",
"matcher": "matcherValue",
"value": "aaa"
} |
| request1.ftl | process | Output |
The next step is to leverage templates from Cucumber tests.
Template parameters via Cucumber
In order to make life easier I recommend using FreeMarker together with the Cucumber library. Cucumber is the most popular BDD (Behaviour Driven Development) library used in test automation. It allows the creation of test scenarios using Gherkin syntax (Given, When, Then), which makes them more readable and clear for all team members. Let me explain now why FreeMarker and Cucumber used together can make our code even simpler.
As we’ve seen in previous sections, we need to pass the process method all parameters required by a template. Conveniently, Cucumber makes it easy to do this.
Let’s consider following Cucumber step:
@When("^Send REST api request with following data$")
public void sendRestApiRequestWithFollowingData(Map<String, String> templateParams) {
  Configuration cfg = setupFreeMarker(ProjectConstants.TEMPLATES\_LOCATION);
  String requestBody =  process(templateName, parameters, cfg);

  restRequestSender.sendRequest("/endpoint","POST",requestBody);
}
The goal of this step is to configure FreeMarker, process a template to generate the request body, and finally post the request to the REST endpoint.
As you can see, the step does not have any code creating <key,value> parameters map. It is defined as a step parameter Map<String, String> templateParams. So where is this map created? To answer that, let’s have a look at the test scenario using this step.
Scenario: Send REST POST request
 Given Send REST api request with following data
|filterKey|test key value   |
|matcher  |test macher value|
|value    |test value       |
As you can see, we create <key,value> parameters Map directly in the test scenario. The first column has template parameters names, and the second column contains parameters values. Note we have to create all mandatory template parameters. Parameter names must be identical to those in the FreeMarker Template. All optional parameters like (${optionalParam}?default(“defaultValue)), can be omitted. If such parameter is omitted, default value is used.
Conclusion
FreeMarker template engine is a great tool to make API test automation easier. It can be used to prepare the request body of each kind of API (SOAP, REST, GraphQL). Thanks to that, we can simplify the test code. It makes code more generic and flexible. It works great with Cucumber as you can supply parameter values directly within the test scenarios. I recommend trying it out!